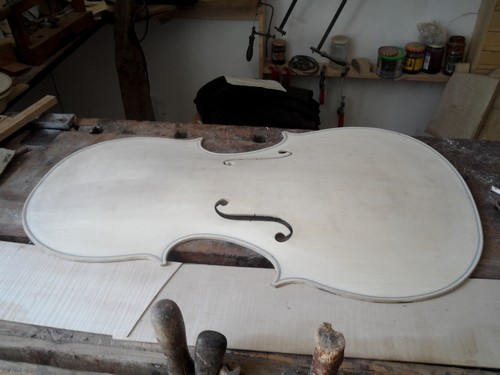
The work has been demanding, there have been various phases that have led me to the completion of the board: from the roughing process with a gouge and a planer to the most delicate phases like cutting the f-holes with a knife, up to the insertion of the purfling.
After the time necessary for the purfling’s gluing, I used a well sharpened gouge and I made the so called fluting and then I finished the whole board with a strickle. This last phase, together with the rough-arching of the board, is my favourite: it is here that the manual work shows all its beauty and the luthier’s personality.
A very important thing to keep in mind when sharpening a work tool is not to heat the tool, not to lose the tempering of the blade. A water grinding wheel is usually used for a good sharpening. The cutting angle should also be shaped according to the type of wood on which the work is done: once the appropriate cutting angle is obtained, the work is finished with an oil or water stone (here I used an oilstone). I always prefer making my own tools, choosing and forging the steels according to the work I have to do, so that I can give the tool the most appropriate shape for the work required.
The soundboard is the part of the instrument that amplifies the sound produced by the vibrations of the bow on the strings, a very important part for the sound quality of an instrument. The soundboard is made of spruce, a very common species, but spruce wood suitable to be transformed into resonant wood can only be found in certain areas. The wood I used for the construction of this cello comes from Val di Fiemme, a forest made famous by Antonio Stradivari, where it is said that he chose the best plants for the construction of his precious instruments. The wood, after a careful selection, is first split by hand, made in quarters and left to season for a few years prior to use.
Once the wood is ready, I start by gluing the board, moving on to the next phase by working with the help of a gouge and a planer and then finishing the piece with a strickle.
Today Andreas Petermann, violinist for the Vallesanta Corde quartet, came to my workshop to see me. He tried my last violin, built on the Stradivari model (the Cremonese), before I painted it. Thanks Andreas, I was very pleased with your passionate and enthusiastic playing, which never fails to surprise me.
Once the time necessary for gluing the linings has elapsed, the various clamps are loosened and the process goes on by levelling the part of the ribs that will be glued to the back with a pad and sandpaper. The back, usually made from the same wood of the ribs, can be peeled or radial for the whole bottom or, as in this cello, in two pieces joined in the middle.
I continue the work by positioning the shape of the ribs on the back piece and by drawing the outline of it with a pencil, using a tool I built, then finally I cut the piece out with a narrow blade.